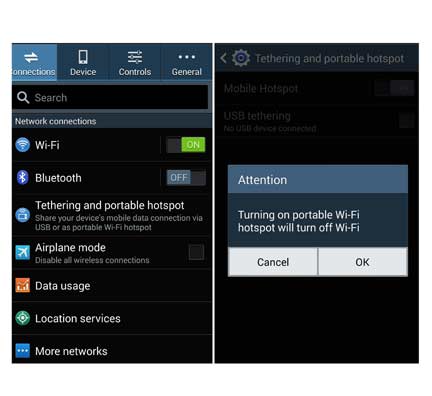
Configure or Setup Hotspot on Samsung Galaxy J2 Pro
Whole the information for you to get the Samsung galaxy j2 pro WiFi hotspot Problems Solution. In this furious, you will able to make the wifi hotspot with the Samsung galaxy j2 pro. We know that education is one of the best processes for increase the brain capacity. So if you learn more than you can acquire more even it's may be anything for you. I just want to show the related site of this page. First, of thing try to know general thing for creating wifi hotspot. You have to know what is wireless internet, wifi hotspot and others aspects of a wireless wifi hotspot. Basically, a hotspot is not a hard work to get success. Although, it's not hard, why the user will not get the access of using this smartphone. Follow the Samsung galaxy j2 pro wifi hotspot problems solution guideline.
Okay, you think anything but I have to thing correct. If you will not access to use the internet then how I will suggest, you have to take as like yourself. An android smartphone has published within various programs but we don't know that how we can use them. However, suddenly I have pace with the problems that I cannot get access to use the internet using wifi hotspot with my android smartphone. So firstly, I had made a factory reset generally. After factory reset my smartphone programs had been clear but the problems wasn't a solution. After a factory reset, when it was not response then I had followed the manual hard reset method as well as again I had setup the hotspot and configure as like me then I had been able to acquire success from getting internet access.
 |
| Samsung Galaxy J2 Pro WiFi Hotspot |
 |
| Samsung Galaxy J2 Pro WiFi Hotspot Problems Solution |
1. At firstly, go on smartphone front page
2. Now in the down site of the right hand, you will see menu or apps option so tap on it.
3. Tap setting via scroll down.
4. Now tap on tethering wifi hotspot.
5. Here, you should only touch on hotspot option.
6. There has a slider to turn on and turn off for wifi hotspot so that you will be done this easily.
How to Connect to Your Hotspot on Samsung Galaxy J2 Pro
1. Firstly, complete turn on WiFi
2. There some network device wouldn't be showed so you have to refresh the list of an available wifi network.
3. Now select the Samsung galaxy J2 Pro from network section.
4. Here, a code may be provided you! As example: 3113055179 so this code you have to put on WP2 field
Now you will see the wifi hotspot above of this Samsung galaxy J2 Pro smartphone display after turn on the wifi hotspot.
How to Configure the WiFi Hotspot with Samsung Galaxy J2 Pro
 |
| Samsung Galaxy J2 Pro WiFi Hotspot Problems Solution |
Without configuring the device, network frequency wouldn't stay well so that you will be required to configure this hotspot wifi on your Samsung galaxy J2 Pro smartphone. Here, has step by step tips for configuring the hotspot.
1. It's same as before, you have to tap on apps option and after appeared apps tap on setting option.
2. Now click on tethering portable WiFi hotspot.
3. Again click only setting section.
4. Now on the above of right corner, you will saw more option so click on it.
5. Now tap in the configure hotspot.
6. Try to set this setting as like yourselves.
7. Now create network SSID via using network name, you have to select Hide My Device to keep security.
8. In the field of security, type provides the password (it's optional) it's maybe open password.
9. Here, you can fix maximum connection within your network device.
10. Lastly, click on save option.
So now you had been successful of configuring this Samsung galaxy J2 Pro device to use wireless wifi hotspot systems.
0 comments:
Post a Comment